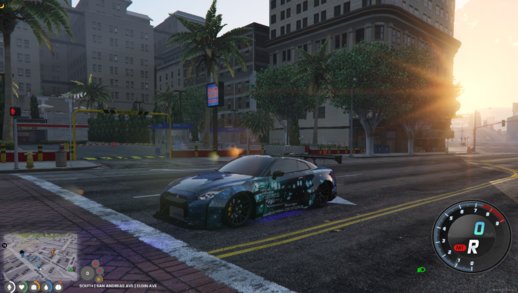
10/3/2021 4:02 made
-- Thanks to Chord Tone, TacoPoPo and the person I don't know that made the original car files that is mostly makes up.
-- Decals by Chord Tone from 2017 GTR-RocketBunny.
-- Template used to make the one on this car by TacoPoPo from 2017 Nissan GTR R35
-- Template on car by SPFGaming.
-- Livery by SPFGaming
-- If using FXserver and not QB-Core
-- Add gtr file to your game resource folder then add start command to server.cfg
-- Use what admin or other spawner to bring the car into game just type gtr
-- If using QB-Core make a new folder in your resources named [vehicles]
-- Then add file gtr to [vehicles]
-- Then add this to your server.cfg Start [vehicles]
-- All your next custom cars you get will go here just make sure you mod the new cars in the code lines below when adding new ones. Then follow the steps.
-- This helps from adding alot of start or ensure in the server.cfg
-- Add both lines of code to your QBCoreFramework_342F8D.base/resources/[qb]/qb-core/shared LUA File
-- See PNG Step 1
-- Go to vehciles list in the code they are all alphabetical.
-- See PNG 2
-- Then find the g's then (see PNG 3)
["gtr"] = {
["name"] = "Gtr",
["brand"] = "gtr",
["model"] = "gtr",
["price"] = 200,
["category"] = "coupes",
["hash"] = `gtr`,
["shop"] = "pdm",
},
-- Use the slide down to move quickly to the first set of green lines in the code. If you don't have green lines you have added the cars below the green lines.
-- See PNG 4
QBShared.VehicleModels = {
[GetHashKey("gtr")] = {
["name"] = "Gtr",
["brand"] = "gtr",
["model"] = "gtr",
["price"] = 200,
["category"] = "coupes",
["hash"] = `gtr`,
["shop"] = "pdm",
}
-- Now start the server go to pdm in game walk up to any car press G then Enter to select your model type which is coupe then go through the list for GTR
press Enter again the backspace until it say E to buy and G to choose Category press E to buy then 7 then enjoy.
-- Last thing change both price from 200 to the amount you want the player to pay. |




![NFSHP: 2004 Porsche Carrera GT SCPD [Add-On | Sounds | Template]](/downloads/picr/2025-04/thbs_1743782349_1743764757_1.jpg)


